Happy 4th of July!

Happy 4th of July! I hope that everyone has a fun and wonderful weekend!

Here are the festive 4th of July ideas we had this year! We had some fun with homemade treats and I even brought 4th of July to my Etsy shop!

4th of July

4th of July

Find out how to make these homemade popsicles HERE!

4th of July

For more Whippersnappers designs, check out the shop HERE!

Whippersnappers

Homemade 4th of July Popsicles

4th of July Popsicles

Hope everyone is having a wonderful summer so far! I absolutely cannot believe that the 4th of July is next weekend already! Time is really speeding by lately that’s for sure. Even so, I am super excited for the 4th!

We decided to make some homemade popsicles because…why not?! Red, white and blue and extremely simple! No joke, I really just threw these together! So perfect if you want to make something homemade but quick and easy.

4th of July Popsicles

4th of July Popsicles

4th of July Firecracker Popsicles!

All I did to make these was slice up strawberries into slices and small bites and add them to a popsicle mold along with some blueberries. You can add however much fresh fruit that you want to be in your popsicles. Don’t forget to add your popsicle sticks or whatever you want to use for a handle! Then I added sprite to fill everything in between!

Wasn’t really sure if these would turn out but they were way good! My son is obsessed with blueberries so these were a hit! Try them out! Super easy and fun for the kiddos 😛

Enjoy!

4th of July Popsicles

Whippersnappers

Kids Breakfast Ideas

Breakfast Ideas

Babies eating solids, toddlers and kids on up!! It’s sometimes a struggle to make a healthy meal first thing in the morning. If your child is anything like my son, he wants food RIGHT when he wakes up. Gee….I wonder where he gets that from 😉 So this was my attempt at giving myself some motivation to switch it up with healthy options. It’s so easy to just grab a yogurt or make a quick piece of buttered toast, which I’m learning is just going to have to be okay sometimes! But I also want to make an effort to give my son healthy eating habits.

It can be hard serving kids healthy meals when they are picky! Especially toddlers who love something one day and are totally disgusted by the exact same thing the next! My son is so hard to feed sometimes. One night he CHOWED down on sesame chicken, white rice and crab rangoons (I was shocked to say the least!) and the next night turned his nose up over simple spaghetti. Anyway…I do my best with feeding him healthy meals as much as I can!

What’s nice about these breakfast ideas is that they are really simple! Nothing too complicated or time consuming here!

Simple Breakfasts:

1) Simple buttered toast with slices of avocado.

One of the easiest! My go-to breakfast with my son.

2) Breakfast pancake muffins with grapes.

These pancake muffins were so easy to make and you can make them up ahead of time, stick them in the fridge or freezer and simply pop one out anytime you want! To see my recipe for them click HERE. You can add in anything you want such as blueberries, banana, spinach, etc.

3) Oatmeal and blueberries.

Bananas are a great add-in as well along with some cinnamon. Another one of my son’s favorites. He’s OBSESSED with blueberries. I prefer using plain cooked rolled oats versus instant oatmeal and just adding in whatever I want.

IMG_9479

4) Scrambled eggs and kiwi.

Also quick and easy!

5) Peanut toast and oranges

Make faces or fun pictures out of food to make it look more fun and appealing! I look forward to my son actually being old enough to appreciate fun things like this! 😛

6) Pineapple shaped pancakes w/ chocolate chips and bananas

Obviously they don’t have to be pineapple shaped! But have fun with it and make pancakes into shapes or characters! This is definitely not a talent of mine. I’ve seen videos where people make faces or detailed images with pancakes…crazy!

7) Eggs (switch it up from scrambled!) with cantaloupe and pineapple!

8) Avocado toast and yogurt

If you’re using an avocado that is in a really soft stage (or you can just mash it up) its perfect for spreading on toast. It’s considered a healthy fat and a super food!

IMG_9907

IMG_0389

9) Strawberries and pancakes!

Clearly I just like making faces out of food! I think I’m still a kid myself! Switch it up with waffles too! Add fruit or shredded spinach for added nutrients as well.

Another fantastic option…Smoothies!!! Here are some great smoothie recipes!

Blueberry – Pear Smoothie

Berry Avocado Chia Smoothie

Celery N’ Greens Fruit Smoothie

Click on Healthy Smoothies in the menu for more smoothie ideas!

Enjoy!

Whippersnappers

Kids Etsy Shop

New Items added to Whippersnappers!

Harem Pants

Harem pants are now available with bright neon cuffs and a back pocket! Super soft and comfy with a baggier look, yet skinnier through the bottom of the leg. Comfy, yet stylish for those energetic little ones!

Harem Pants


Harem Pants

Check these out and more in the shop! Etsy Shop link is in the right hand corner of the main blog menu. You can also click below for a direct link to the shop!

https://www.etsy.com/shop/WhippersnappersUSA


Whippersnappers

Whippersnappers

Homemade Orange Gummy Bears

Orange Gummy Bears

Okay, it has definitely been way too long since I have done any blog posts! It is so difficult to keep up with everything but I’m doing my very best! I’ve really been focusing on my new Etsy shop lately, however, I really enjoy the blog so I want to keep it up to date as best I can!

As I have mentioned previously, I am probably going to be going crazy with making all different kinds of homemade gummy bears and fruit snacks since it was such a hit with my son! Such a perfect snack and a much healthier alternative to store bought.

These orange gummy bears are exactly as it sounds, full of orange goodness! I thought they tasted great and so did my son!

How to make:

Orange Gummy Bears

Homemade Orange Gummy Bears

Use:

– 1/2 Cup orange puree (use 1 large orange to get approximately this amount)

– 1/2 Cup Orange juice

– 3 Tbsp powdered gelatin

– 1 Tbsp honey

Peel and slice the orange and blend well in the blender. No need to add any liquid since there is already enough liquid in it to puree it well. Measure out 1/2 cup of the puree and set aside. Heat juice along with gelatin in a small saucepan for about 5 minutes while stirring. Do not bring to a boil. Add juice mixture to the puree slowly while stirring. Add 1 Tbsp honey and stir it in well. You could add any other add ins you would like as well such as chia seeds for example! Poor into a pan wide enough so that the gelatin mixture is fairly thin. An 8×8 pan works well. Let mixture set in the refrigerator for at least 15 minutes. Cut into gummy bear shapes or any other small cookie cutter shapes you want!

That’s it! Quick and easy. Best of all, this recipe just uses honey for a sweetener to make it that much more healthier for those little tummies! Remember not to give honey to babies under one year old.

Enjoy!!

Whippersnappers

Homemade Avocado Hummus

Avocado Hummus

My new thing to make lately is homemade hummus. Which is weird because…I don’t really like hummus. But my son does and if he likes something that is healthy and will actually eat it then heck yes I’m making it! He will pretty much eat anything if it can go on a cracker. Hummus is really good for you and has protein. This is awesome for little ones who don’t get a lot of protein. Sawyer loved the plain hummus I made so I thought adding avocados would make it that much better!

Find my classic homemade hummus recipe HERE.


How to make:

Avocado Hummus

Avocado Hummus

Avocado Hummus

Avocado Hummus Recipe

This recipe is super simple! All you really need are the ingredients and a blender! Boom…done! This particular recipe also makes quite a lot so if you don’t eat a whole lot of hummus you may want to half it. It lasts about a week, after that starts to turn a bit brown.


What you need:

– 2 Cans Garbanzo Beans (also known as chick peas)

– 2 Avocados

– 2 Cloves Garlic

– 3 Tbsp avocado oil

-1 Tbsp Lemon Juice

– 1 tsp Cumin

– 3/4 Cup water

– tsp salt


Rinse garbanzo beans. If you really have a lot of free time then you could consider peeling the garbanzo beans. I didn’t do this since it is a bit tedious but I have heard that it can make a big difference in making your hummus really smooth. Add everything to the blender and blend well. Add more water if you want it creamier.


Enjoy!


Avocado Hummus

Whippersnappers

New Slouchy Beanies Available

Slouchy Beanies

I’ve added a few new patterns for the reversible slouchy beanies!! Available in sizes newborn – 5/6T.


Check them out at:

http://www.whippersnappersusa.etsy.com

You can also find the link in the blog menu by clicking on “Etsy Shop.”

Blueberry – Pear Smoothie

Blueberry - Pear Smoothie

Back to smoothie-making for me! I have gotten so much use out of that Sili Squeeze I got to be able to easily feed my 1 year old smoothies. Definitely got my money’s worth out of that one. He absolutely loves smoothies and loves using it! Except for the fact that I still am not at the point where I can just give it to him and walk away or else he would just squeeze it eeeverywhere! So I still just hold it for him but it’s still way more convenient than using a spoon or just a regular cup and straw.

This smoothie isn’t just for babies and kids…I thought it was delicious too! Make a whole blender full and you could share it with the little ones 🙂 And since there is kale in it, even though it looks and sounds so unappetizing, you really don’t taste it so it is super healthy too!! All I could taste was blueberry, pear and yogurt goodness! I used 100% pure pomegranate juice for my liquid, which also has many health benefits.

Blueberry - Pear Smoothie

Blueberry - Pear Smoothie


Blueberry - Pear Smoothie

How to make:


Blueberry-Pear Smoothie

– 1 Pear

– 1/2 Cup Blueberries

– 1 Stalk Kale

– 1/2 Cup Yogurt (When making this for my son I used Stonyfield YoTot Whole Milk Blueberry Yogurt)

– 1/2 Cup Pomegranate Juice

– Handful of Ice

Make sure to wash off fruit and kale. Peel and core the pear. Add everything to the blender and blend well adding more pomegranate juice if you need more liquid.

This tastes so amazing! I really think that blueberry and pear is a great combination! If you have younger babes, check out my Blueberry-Pear baby food puree on my Homemade Baby Purees page. I made this a while back when my son was still itty bitty and he loved that combo even then too!

Enjoy!


IMG_0044_fotor

Whippersnappers


Monthly Dinner Menus

Monthly Dinner Menu

This is something that I have been wanting to post for awhile since it has been so helpful to me. I (like many people I’m sure….I hope…) get so busy getting other things done and thinking of a million and a half things that by the time supper rolls around, I don’t have anything planned. So many nights have consisted of whipping up something quick simply because I don’t feel like making something or it’s too last minute to thaw out chicken or anything else for that matter! This means many nights of “Lets just do spaghetti…” or “Lets go out to eat instead.” Which means it either starts to get boring making the same ol’ thing or costly by going out to eat more often.

So I finally discovered a routine that really helps me with this problem so I want to share it! I’m sure I am not the only person who does this but I wanted to get it out there anyway! I must admit, this does take a little bit of organization but it really will save you in the end!

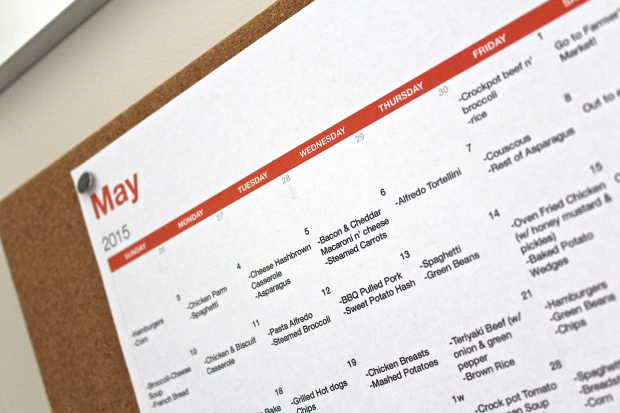
I started making these monthly dinner menus a few months ago and my husband and I LOVE it! I think some people may think this is crazy and that’s okay! But for me and my family, it really works!  I type up and entire month of meals planned out for each day. Including everything: main dish, sides and vegetables. I do this at the end of each month so then just a few days before the new menu begins I do one big grocery trip. It DOES feel like an expensive trip but I find myself not having to go to the grocery store every other day for certain meal items. I do still make quick trips now and then for fresh fruit, milk…things that just don’t really last a whole month.

Positives to monthly dinner menus:

-You have something planned for each day

-Groceries can all be bought ahead of time

-Be more organized so things don’t go bad (I hate wasting food just because I forgot about it!)

-Having everything written out gives you a visual of what you’re eating so you can be motivated to eat healthier

-Planning meals out ahead of time makes it easier to take the time to try new recipes


When I plan out a menu I take an evening to sit down and pull up all of those amazing looking Pinterest recipes that I have been wanting to try! Whereas, if I am just trying to make dinner plans last minute, chances are I am not going to try something new or even have all of the stuff for it. I also get super frustrated when I have to go to the grocery store a million times because I forgot something for a recipe (okay this still happens, who am I kidding! 😛 ) so planning ahead of time, looking at recipes and making a grocery list for everything really cuts down on this a lot.

Tips for making a monthly dinner menu:

– Leave Saturdays (or whatever day you have open and like to splurge) open for pizza, going out to eat or anything else fun your family likes to do.

– Take leftovers into account. If your family likes leftovers leave days after larger meals open for leftovers. I don’t usually plan for leftover days since it works out really well for my husband to take leftovers to work for lunch.

– Don’t plan huge meals that make lots of leftovers multiple days in a row, spread it out.

– Still plan for quick n’ easy nights like simple pasta or grilling burgers. For example, when I make lasagna I make the sauce homemade and have lots leftovers. So we will freeze serving sizes in ziplock bags to take out and quickly make up spaghetti or a pasta bake another night.

– Add new recipes you’ve been wanting to try to your menu.

– Add a vegetable to your menu for each day. I feel like by having a particular vegetable actually planned makes it way easier for me to have vegetables each night. Otherwise I find myself saying, naaa we don’t really need it! This is extra helpful for me since I want to be setting a good example for our 1 year old!

– Switch things around! There are times when my husband has to work late so we will just switch what we had planned with something simpler from another night. Make sure to still stick with it though or it is easy to fall out of taking the time to make the menu and follow it.


Hopefully this helps some of you the way that it helps me!

Banana – Coconut Homemade Gummy Bears!

Banana - Coconut Gummies

Any sort of snack that is an easy grab n’ go snack or something that I can simply give my son without having to feed it to him has become a staple in our house! The homemade gummy bears that I made a few weeks ago was a complete success! My son loved them and the great thing is that they don’t have a ton of added sugar or artificial ingredients like store bought gummy bears or any other sort of fruit snack. In fact, they’re purely fresh fruit puree, juice, gelatin, honey and any other healthy ingredients you may want to add in! So needless to say, you can expect that I am going to have fun with this and experiment with different flavors 😛

I whipped up these banana-coconut gummy bears at the same time I made my strawberry-pomegranate gummy bears and am finally finding the time to write about it! Find the strawberry-pomegranate gummy bears HERE if you are interested.

These actually became somewhat of a joke in our house since my husband and I were digging into them just as much…they are quite addicting!

How to make:

Banana - Coconut Gummies

Banana - Coconut Gummies

Banana/Coconut Gummy Bears

Ingredients:

-1/2 Cup pureed bananas

-1/2 Cup Pineapple – Coconut water (plain coconut water would work just fine).

-1 Tbsp Honey

-3 Tbsp Gelatin powder


Add 1-2 bananas to the blender (depending on how big your bananas are and about how much will make 1/2 cup pureed) and puree until very smooth. Add a small amount of water if needed to puree smoothly. Cook coconut water and gelatin powder in a saucepan over low heat until the powder has dissolved (4-5 minutes) while stirring. Do not let mixture come to a boil. After the powder has dissolved take the liquid off of the heat and slowly add it to the banana puree while stirring. Add honey and stir until combined. Pour the mixture into a pan or gummy bear molds. If you use a pan you want to use a size that will make it so the liquid is fairly shallow. An 8×8 or 9×9 inch pan would work well.

I did find that these did not last as long as the other gummy bears I had made. Bananas kind of get gross if left out so I suppose the same things happens when in gummy bears! They last about a week or less in an air tight container in the fridge.

Enjoy!


Whippersnappers